"Beauty will help you get the attention, personality will help you capture the heart, but attitude will help you make everything last."

Splurge!

Legendary Special Effects Make-up Artist Rick Baker colaborates with MAC...

Splurge!

Rihanna Collaborates with MAC Cosmetics for Riri Hearts Fall 2013...

Editorial!

Editorial featuring Sam Ajdani wearing Suits for the modern man...

Tools Of The Trade!

Read my review on ArtNet Professional Brush #153...

Behind The Scenes!

Hair and Make-up for Katrina! Click here...

Beauty Feature!

Eye Makeup with the Colors of Spring 2013!

Monday, January 21, 2013

TOTT! ELF Powder Brush (Flat Top)!

The best way to make foundation and makeup last is setting it with powder. And how you apply the powder is very important. Equally as important is the tool you use to apply the powder.

Other than the powder puff, which is one of the best btw, the E.L.F. Powder Brush (Flat Top) is my one to go to brush in setting foundations with powder. In fact it’s the only thing I use nowadays with my clients. The brush is so much easier to clean than the powder puff.

What I really like about this brush is the fact that it has a flat top. Its flat top is perfect in setting in the foundation. If you put the powder onto the skin using the flat top it will seal the foundation onto your skin completely (almost).


Unlike a traditional powder brush, which takes away the foundation when you swipe it onto the skin with powder, elf powder brush will not. As you tap the flat top of the brush on your skin with powder it will press the foundation making it stick with the skin even more.

 Here's what the website describe this brush:
This new anti bacterial, synthetic haired Taklon brush is softer and more absorbent and can be used with wet or dry products. Be a professional makeup artist and create a flawless look with this e.l.f. studio brush! Creates a professional sculpted look. Full coverage colour. Use for powder or blush for perfect contouring.
The brush is soft but sturdy enough not to give when the flat top is press onto the skin.When I set the foundation with powder I dip the brush into powder and tap off the excess. Then I tap powder using the flat top starting from the forehead going to the hairline then down to the cheek area then the outer part of the face. I tap and press as I go making sure that every part of the face that I applied with foundation was never skipped. This way the, I am confident that the foundation will not budge, will stay put and will last longer.

For demo purposes I'm using a darker foundation than my skin color to make the result more visible.

Step 01: Place enough powder on the cover of the powder container.
Step 02: Dip brush.
Step 03: Tap off the excess.
Step 04: Tap and press the flat surface of the brush onto the skin.


Easy, right? Check below photos to compare the area without and with powder.


The area we set with powder using E.L.F. powder brush looks natural and flawless.

Other that setting the foundation with powder. I also use this brush to contour the face. The side of the brush is perfect for creating that nose line and that line under the cheek to make your face look slimmer. Then I used the flat part to blend where I contour to eliminate harsh line.

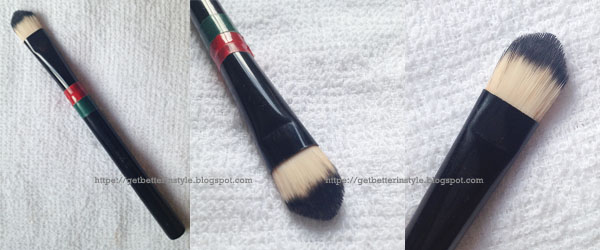
I have two. One for setting the powder (taped with red-green tapes) and the other one is for contouring (taped with red-green-yellow tapes).


The brush is so easy to clean, since it is synthetic made of Taklon it also dries a lot quicker than my other synthetic brushes.

I've heard that other people also use this brush for putting foundations (liquid, cream, powder, etc.) but I haven't tried it yet since I already found other brushes perfect for that job. Some even use this brush in applying blush on the apples of the cheek. That's how versatile this brush is. And I say these reasons make this brush a keeper.

Plus the Php 249.00 price tag doesn't really hurt the pocket.

There's nothing bad that I can think of to say against this brush, really.

Verdict: Love. Like. Nice. Skip. Drain.

This brush is really nice to have and has become a 'must have' in my kit.

Saturday, January 12, 2013

Quick Tip! Save Your Favorite Mascara Wands!


Do you hate it when you have to throw away your empty mascara tube along with it your favorite mascara wand? Or having your favorite mascara but you doesn’t really like the wand that comes with it? I certainly do.

Now, I got a little quick suggestion for you. Throw your empty mascara tube but save the mascara wand. Just clean your wand and reuse it! Here’s how I do it:

First, gather all the things you need:


Your empty mascara tube with your favorite wand with it.


Dishwashing soap (preferably with antibacterial formulation) and bowl or container (big enough to soak the wand).


Brush cleaner.

Tissue or towel, old toothbrush and zip locks.

Here’s how I clean my favorite mascara wands:
  1. Put dishwashing soap in an empty container.
  2. Soak your favorite mascara wand overnight. This will remove the mascara from the wand when mixed with dishwashing soap.
  3. Brush gently your mascara wand with old toothbrush to remove mascara off the wand.
  4. Put your wand under running water until all mascara is gone.
  5. Then roll your wand on a towel to dry it.
  6. Then place your wand on top of a tissue and spray it with a brush cleaner.
  7. Then roll it on the tissue and place it on top of another tissue to dry.
  8. Now your favorite mascara is clean and is now ready to use. Just put it on a zip lock for storage and to prevent it from getting dirty.

How to use your favorite mascara wand:
  1. Choose your favorite mascara then take ample amount off the mascara (from the wand that comes with it) and place it on a mixing palette or at the back of your hand.
  2. Get your favorite (clean) mascara wand and swipe it gently on the mascara you placed on the mixing palette or at the back of your hand.
  3. Swipe the mascara onto your lashes.
  4. Now you have a great looking lashes using your favorite mascara and your favorite mascara wand.
Easy, right?

Let me know what you think about it.

Friday, January 11, 2013

DIY! Mix Your Own Lip Color in 4 Easy Steps!


Sometimes when you are mixing and painting two different colors of lipstick on a client (or yourself) the process can be messy and can be time consuming. Sometimes you end up putting color on other tube then staining and ruining the original color. To save time and prevent you from getting messy during mixing two different colors of lipstick (on actual makeup application) follow the simple steps to create your own mix of lip color below.

Note: If you are a kid make sure you ask your parent (or an adult) to assist you.

Click here to go directly to the 4 easy steps.

Things you need:


1. Your favorite lipsticks in different colors.


2. Spatula for taking small part of lipstick from a tube and mixing lipsticks together.


3. Teaspoon or


Tablespoon (for larger container).


4. Empty lipstick palette or


Empty tiny jars (you can buy from Landmark, Beabi or Muji) to put your lip mix.

5. Flame (from a stove or from a candle).

Here are the 4 easy steps:


  • Using the spatula, slice a portion of your favorite lipstick and place it on the spoon. Clean your spatula then slice another portion of lipstick with different color and add it to the first lip color. It is up to you to place the ratio of two different colors. Just add some more to achieve the color you want.
  • Then place it above a flame with medium heat (I place mine over a stove but you may use a candle and it will do the trick) to melt.
  • Mix the lipstick by stirring then well with spatula when melted to get an even mixture.
  • Place the mixture on an empty palette or jar and allow the mixture to harden.

Congrats! You got yourself a new shade of lip color! Just use your lip brush to get color from the pan and apply it to yourself. Easy, right?

Enjoy creating your lip color too and let me know what you think about it.

That's it but you may check more photos below for more color mixtures I created.


Here's another mixture. Lovely color, right?


You may also mix the two lip colors together before melting to create your new lip color a bit faster.

I created a total of 11 lip colors by mixing different lip colors and different rations. Check all the colors and ratios below:

Mix 1, 2 and 3.

Mix 4, 5 and 6.

Mix 7, 8 and 9.

Mix 10 and 11.

And here are the new shades of lip colors I created on a palette. I numbered the colors based on the mixtures above. The ones with no numbers are the original shades I used to create the new lip colors.

Palette 1.

Palette 2.


QUICK TIP: If you are a bit OC you may use hair blow drier to make your lip color look even and a lot better in your palette. Just let the heat from the blower melt the top part slowly to even it out in the palette (see photo below).


Happy mixing!!!

Wednesday, January 9, 2013

Review! Nyx Eyeshadow Base in Skin Tone!

NYX Eyeshadow Base in Skin Tone - is my little secret on how I make the eyeshadows pop (and last) on my client's eyelids.

What the website says about it:

Maximize the intensity, longevity and unashamed brilliance of your eye shadow statements with our eye shadow primer pots. Each of the three NYX Eye Shadow Bases—for vibrant, pearl or neutral tones—creates a smooth canvas for color, increases its durability and prevents fallout.

I actually came across NYX's eyeshadow base by accident. I was looking for orange and green correctors then when I found this gem. I found it on a makeup shop (I forgot the shop's name) in Glorietta (it's on the 2nd level near the area where SM Makati and Glorietta are joined). That time the correctors that I were looking for were not available so I end up trying several other products instead and one of these is NYX Eyeshadow base which I like instantly.

My NYX Eyeshadow Base in Skin Tone.

I put a small amount of the product on the back of my hand to test its consistency. The texture is creamy just like your cream concealer. It has a flesh tone just perfect for most skin types.  I gently pat it on the back of my hand to blend. It did blend well on my skin.

Then I took some of the available eyeshadow testers on the store and tried to swatch them without the base and on top of the base. The eyeshadows on top of the base pops! And right then and there I bought a jar for myself. And ever since NYX Eyeshadow base is my go to eyeshadow base for my clients.

What I like about NYX Eyeshadow base:

  • The texture is creamy just like concealers which is easy to blend on the eyelids;
  • The color is flesh tone so it will look like skin on most skin types;
  • It is opaque so it will even out the eye area for eyeshadow applications;
  • It helps eyeshadows to look its true color;
  • It helps eyeshadows to have something to grab on to so eyeshadows will stay and not stray;
  • It helps eyeshadows last all day long without fading and creasing (with proper technique);
  • The pot has 7g worth of product so it will definitely goes a long way;
  • It is affordable (under Php 500.00).
What I don't like about NYX Eyeshadow base:

None that I can think of really. Even the oiliest eyelid will benefit from it (you just have to know how to prep your eyelids).

Here's the comparison of NYX Eyeshadow base VS a 5 peso coin.

How I apply it?

I first prep the eye area to remove excess oil to make sure that the base will not crease and fade.


I just use my Jazzy concealer brush from James Cooper Cosmetics to get the needed amount of eyeshadow base from the pot. I use this brush for this purpose only. One dip and swipe is all I need for one eye. Then I use my ring finger to blend it.

NYX Eyeshadow Base when open.

Dip and swipe Jazzy concealer brush to get enough product for one eye.

That product on the brush is enough for one eye.

Then I swatch it on the back of my hand. See photos below on different lighting condition within my room. The left part is unblended while the right part is where I blended it on skin. Looks like skin, right? Well only better.


I took some of my eyeshadows so that you can see the difference with and without the makeup base. The top part are eyeshadows without the base and the lower part are the eyeshadows with the base underneath. See how the color pops, especially on the rightmost eyeshadow where it is almost not visible without the base.


The black looks true black and became opaque, same with the brown. Check photo below under different lighting condition.


I even tried placing my hand under running water just to check what happens. Well, since I'm using waterproof eyeshadows the eyeshadow stays but the ones with base beneath still looks the same if not became more opaque.


I really like NYX Eyeshadow base because it is creamy and flesh tone, it makes eyeshadow color pops, it extend the staying power of eyeshadow, it prevents crease and it's affordable and one pot will last very long.

And when I ran out of it, I will definitely purchase again.

Have you tried NYX Eyeshadow base? What do you think of it?

Rating: 5 out of 5

NYX Eyeshadow Base and NYX eyeshadows are used in the photo above.

Photo credit:
Model: Cheska
For Anton Belardo Collection


Saturday, January 5, 2013

Emerald Green! Color of 2013!

Emerald green is the color of 2013! I like the freshness that this color evokes. This color brings you closer to nature. This will surely add as inspiration to all of us in decision making in terms of beauty, grooming, style, design and other stuff that we do everyday. I am already excited to use the color emerald not only to my clients but to my everyday style as well.

Are you happy with the color choice? What do you think of the color? Are you as excited to use it like I do?

According to Leatrice Eiseman (executive director of the Pantone Color Institute) emerald is “The most abundant hue in nature, the human eye sees more green than any other color in the spectrum. Symbolically, Emerald brings a sense of clarity, renewal and rejuvenation, which is so important in today's complex world. This powerful and universally-appealing tone translates easily to both fashion and home interiors.” 
Some trivia about emerald according to wikipedia:
- Emerald, also called emerald green, is a tone of green that is particularly light and bright, with a faint bluish cast. The name derives from the typical appearance of the gemstone emerald.
I gathered some photos (from google) that will give you an idea on how and where to use the emerald color and incorporate it in your daily lives and on some special occasions. Below are some stuff with emerald color for inspiration:

Fashion:

According to Pantone.com:
Appropriate for every occasion, Emerald’s classic elegance makes for striking and irresistible women’s formal and everyday wear as well as accessories. Emerald also makes a strong statement in men’s sportswear, knitwear and ties.

Beauty:

According to Pantone.com:
Equally harmonious on the cosmetic color wheel, Emerald dramatizes all eye colors as it beautifully enhances green eyes, is compatible to blue eyes, emphasizes the green undertone in hazel eyes and intensifies brown eyes to make them appear deeper. Emerald is also a perfect complement to peaches, pinks, roses, ruby reds and aubergines – offering a variety of lipstick and blush options. For those who want to sparkle and stand out, Emerald is the perfect punctuation point in nail color because of its complementary nature.

Home:

According to Pantone.com:
Enhance your sense of well-being at home by rejuvenating the interior with Emerald paint, accents and accessories. This jewel-like hue will create a luxurious feel in an entryway, powder room, dining room or study, and bring life to a living room as an accent wall.

And other stuff:


Related Posts Plugin for WordPress, Blogger...