"Beauty will help you get the attention, personality will help you capture the heart, but attitude will help you make everything last."

Splurge!

Legendary Special Effects Make-up Artist Rick Baker colaborates with MAC...

Splurge!

Rihanna Collaborates with MAC Cosmetics for Riri Hearts Fall 2013...

Editorial!

Editorial featuring Sam Ajdani wearing Suits for the modern man...

Tools Of The Trade!

Read my review on ArtNet Professional Brush #153...

Behind The Scenes!

Hair and Make-up for Katrina! Click here...

Beauty Feature!

Eye Makeup with the Colors of Spring 2013!

Monday, February 18, 2013

Get The Look! Black And Red Butterfly Eye Makeup!


I was asked to help Yeoh Models for their Spring Summer 2012 Package shoot. The inspiration behind the look for the girls for the shoot is the dark shade surrounding the eyes of a raccoon. During the shooting day, we (the make-up artists) were told to modify the color of the eyeshadows as we like as long as we still include black eyeshadow and retain the shape of the raccoon eyes.

For the model's eyeshadows, I chose the red eyeshadow to mix with black to mimic the color of the wings of a black-and-red butterfly. I really like the outcome and I will be sharing you today how to recreate the look.


Model: Patricia Go of Yeoh Models
Photo & Make-up: Henry G. Anima II
Hair: Mycke Arcano


For this look I use NYX Makeup Make-up Artist kit (photo shown above).


I marked the eyeshadows in the palette for easy eyeshadow reference.

Black and Red Butterfly Inspired Eye Makeup:

Follow the simple steps to below to achieve the look.

Note: Placed the product/s on the space enclosed in white line on the photo above each steps.


Step 01:
Prime and put eye makeup base on the entire eye area starting from upper lash line up to the brow bone. I use NYX Eyeshadow base in skin tone.


Step 02:
Using a blending brush like Mac 224 place black eyeshadow in D3 on the outer eye area and swipe it on the crease towards the inner eye area near the nose. Make sure to use gentle strokes so that the less eyeshadows will be placed on the inner eye area of the crease.


Step 03:
Using a dome eyeshadow brush like Mac 239 place red eyeshadow in F6 on the lid area. Carefully blending it on the edge of the black eyeshadow placed from the previous step. Add more layer of the red eyeshadow depending on the intensity of the color that you want to achieve.


Step 04:
Using a eyeliner brush like Mac 210 place a black gel or cream liner on the upper lash line. Then smudge the gel/cream using Marionnaud No. 8 pencil brush.


Step 05:
Using Marionnaud No. 8 pencil brush place red eyeshadow in F6 on the lower lash line. Starting from the outer eye corner towards the inner eye corner. Make sure that you blend the eye shadow well.


Step 06:
Using a small angle brush like Mac 208 place a black gel eye liner on the lower waterline. Then slightly blend it on the lower lash line.


Step 07:
Using Marionnaud No. 8 pencil brush place black eyeshadow in D3 on the lower lash line to blend the black gel eye liner.


Step 08:
Using a blending brush like Mac 217 combine eye shadows in D1 and D6 the place it on the brow bone towards the inner eye corner in a wild shield wiper motion. Make sure to blend the edges well.

Then Curl your eyelashes with Shu Uemura Eyelash Curler. Apply 2 coats of Maybelline The Magnum Volum' Express Waterproof Mascara (let the mascara dry for 3 to 5 seconds before applying the second coat) from roots to tips. Add false eyelashes to your liking.

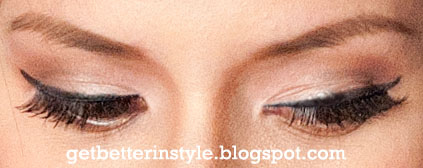
Below are the finished look:

Eye Makeup with eyes close.

Eye Makeup with eyes open.

For Patricia's Brows:

For her eyebrows I use wet n' wild ultimate brow kit powder in Ash Brown. I use the lighter one using MAC 208 brush. I first fill in the highest point of the arch towards the tip of the eyebrow before filling in the part near the nose.

Tip: Try to draw the shape first and check if you like it before putting more eyebrow powder. It's always easier to pack colors than removing the excess. I hope this helps.

For the Face:

I use 2 color of True Match foundation to achieve her skin color. Then I mix nyx, kryolan and covergirl concealer on under eye area, sides of the nose/mount and on spots that need concealing. Then I use kryolan transparent loose powder to set the makeup using E.L.F. powder brush.

For the Cheeks:

I use Maybelline blush in peach and cinnamon using Nars Yachiyo brush. Note: You should put lip balm like Carmex after skin prep.

For the Lips:

Step 01: Line the entire lip area (upper and lower lips) with Etude House Lip Liner in Natural. Purse lips together to distribute lip liner evenly.

Step 02: Apply Kryolan Lipstck in #LF401 (nudel-coral shade). Purse lips together. Repeat this step twice or thrice depending on how long you want your lipstick will stay.

Step 03: Then add a coat of Kryolan Lipstick in #LC132 for that hint of orange. Purse lips together.

Step 04: Set lipstick by pressing tissue in between your upper and lower lips.

Step 05: Apply Etude House clear Lip Gloss in the Middle of your lower lip.

I hope you like her look and like the tutorial too. Let me know if you are able to recreate the look and what you think about it.

Enjoy!

Tuesday, February 5, 2013

Make-up Heroes! Kevyn Aucoin!


Before I was doing make-up, as a photographer I always look for something that inspires me. One way to be inspired is I look at the photos created by famous photographers from different books and magazines. Since I can’t afford to buy new magazines, Booksale has been my go to – my haven, when I need to be inspired. Aside from the fact that old books and magazines (back issues) are already opened, there are some that are really cheap and I can finally afford them.

Images courtesy of http://www.refinery29.com/ and http://www.wornthrough.com and http://pinterest.com/Haute123/by-kevin-aucoin/

I used to live near Cubao, Quezon City and whenever I go home from work I always visit Booksale located in Shopwise Cubao. I am always excited whenever I get the chance to visit the shop and always hoping that there’ll be new books and magazines for me to browse and like enough to buy. And that has been almost my routine for the entire 5 years of my stay in the area.

Creating make you feel like you are alive. When you are not creating you are not living. And I felt so alive when I was creating.

I accumulated so many magazines that it almost reached the ceiling of my room and I have 4 columns of pile of these magazines. But I left most of the magazine when I left the place. That time I really had to moved out and I’ve only got limited time to transfer my stuff to where I live now because I can’t really afford transferring my entire stuff that time.

Images courtesy of http://filmexperience.blogspot.com and http://pinterest.com/Haute123/by-kevin-aucoin/

One of my favorite book that I got there was the book “FACE FORWARD” by Kevyn Aucoin. It was already old and has a coffee stain on the cover and some of the pages where already detached from the bone but it’s a good book (and really cheap) so I bought it. The reason I bought it is that I remembered browsing the book inside the shop and realized that Kevyn did the make-up of most of the photos that inspire me from the books and magazines that I saw. It made me realized that teamwork from different creative minds could create images that are really striking and timeless.

“If you wait your whole life for somebody else to tell you it’s ok to be you – you might wait forever.”

The book is about transforming a person into another person/character. And I was amazed how creative and good he really was. I also learned that he does photography and he photographed all the images shown inside the book.

Image courtesy of http://www.catwalkqueen.tv

Little did I know that Kevyn inspired me in such a way that I wanted to create images that inspire people just like how these images inspired me. The fact that I also paint gives me the idea that maybe I can also paint faces using make-up.

“Beauty is about perception, not about make-up. I think the beginning of all beauty is knowing and liking oneself. You can't put on make-up, or dress yourself, or do you hair with any sort of fun or joy if you're doing it from a position of correction.”

Maybe one of the reasons why I also like creating tutorials here on my blog is because of Kevyn and his book “FACE FORWARD”.

Image courtesy of http://media-cache-lt0.pinterest.com/upload/125889752053340577_6YTw1vXS_c.jpg

Then I search more about him and his body of work and learned that he’s really big in make-up and fashion world. He worked with legendary celebrities and photographers and with him they created unforgettable and iconic images. And people really like him and his work. Sadly he already passed away.

Today I choose life. Every morning when I wake up I can choose joy, happiness, negativity, pain... To feel the freedom that comes from being able to continue to make mistakes and choices - today I choose to feel life, not to deny my humanity but embrace it.

See my two favorite videos of and about Kevyn and I hope you’ll enjoy these videos too.

Kevyn's Interview

What they say about Kevyn

To know more about Kevin Aucoin visit his wiki page.

Monday, February 4, 2013

TOTT! Charm PRO Big Blending Brush #11!


Another brush that caught my eye is Charm Pro Big Blending Brush #11. I think I already have 12 blending brushes but additional 2 won't hurt, right? Yes I bought two of these. What makes this brush very appealing to me is the hair color - which is white (just like my MAC 217 brushes). Most of my blending brushes are either black or brown (the two different ones are the stippling eye blending brush and the blending+dome eye brush that comes with Urban Decay's Naked 2 palette).


Here’s what the website tells about Charm Pro Big Blending Brush #11:

Charm PRO Makeup Brushes are made from the best quality and precise craftsmanship that will ensure you professional results in your makeup application!

The CHARM PRO Blending Brush is a must-have as a blending brush, as it de nes and contours your crease, and also blends eyeshadow into a seamless gradient. Made with the right fi rmness, it gives you control while blending your eyeshadow.

I have this brush for more than a month already and I already used, cleaned and washed it a couple of times so I think I can also do a review of it now just like the Charm Pro Eye Shader Brush #7.

Front View and Top View

While most of my blending brushes are really soft Charm Pro Big Blending Brush #11 is not that soft, which makes this brush unique among my blending brushes. And I like it that way.

It is not stiff but is firm enough not to over-blend eye shadow color, which really helps when I needed a blending brush to do that for me. This brush helps me achieve a certain gradient that don’t fade the color, which happens when you over-blend.

My Charm Pro Big Blending Brush #11 brushes.

Among my blending brushes Charm Pro Big Blending Brush #11 is the densest. It picks up color really well and helps me blend the outer V and crease area without over-blending. And since the brush is dense, I really like using it to blend concealer on the under eye area and corners of the nose.

I also like to use this brush on creamy products like the Maybelline 24 Hour Color Tattoo.


Since this is not the softest blending brush you need to blend the eye shadow more if you want to use it that way (which I don't on this brush) since I’m using another blending brush for that purpose. Sometimes it is a bit scratchy but not to the point that it hurts the area where you use it so it is not a big deal. There are few hairs that shed but nothing sheds after two washes.

I really like the white hair.

This retails for Php 399.00 but I got it with 10% discount at The Ramp Glorietta.

Verdict: Love. Like. Nice. Skip. Drain.


I am satisfied with the 2 Charm Pro Big Blending Brush #11 brushes that I have. It picks up color really well and does not over-blend and losing all the definition of the eye shadow color. I can also use it on concealers to blend the edges and creamy eye shadows from placing wash of color as base to building the color intensity to my liking.

Sunday, February 3, 2013

Get The Look! Pin-up Inspired Makeup for Slimmetry!


I've got the chance to do the makeup and photography for Slimmetry's Ad Campaign. Slimmetry is a clothing brand specializing in Body Forming Corsets and Swimwear. And the makeup for the campaign is inspired by pin-up girls of 1950's. This decade celebrates the voluptuous curves of women and that's what Slimmetry is trying to offer women now - achieving the curves you deserve.


Our model for the campaign is Tanja Winheim - a Spanish/Filipina beauty. The make-up is so sexy and yet so easy to achieve. And it fits for all women. To get the look, just follow the simple steps below:


You may use Dollface 88 Earth Color Palette to create this look.

Tanja's 1950's Eye Make-up:

Note: Placed the product/s on the space enclosed in white line.


Step 01: Prime and put eye makeup base on the entire eye area starting from upper lash line up to the brow bone. I use NYX Eyeshadow base in skin tone.


Step 02: Then using medium shading brown eyeshadow with red undertone, swipe in a windshield wiper motion starting from the outer corner to the inner corner of the eye area to define the crease using a blending brush. I use a Artnet #154 brush to deposit and blend the eyeshadow.


Step 03: Then place a matte skin tone eye shadow on the entire lid and blend it well on the edge of the crease using a dome eye shadow brush. I use Artnet #112 brush to pick-up and deposit color.


Step 04: Then place a matte black eyeshadow on the outer V and outer crease of the eye using a pencil/pointed brush. Make sure to blend the eyeshadow well with the crease color. I use Marionnaud #8 brush to pick-up and define the color.


Step 05: Then place a shimmer vanilla eyeshadow on the inner corner of the eye, center of the lid and the brow bone area to create highlight using a small dome eyeshadow brush. I use the brush that comes with the 10-piece brush set from Suesh.


Step 06: Then place the same eyeshadow color that define the crease on the lower lash line using the a pencil/pointed brush. I use Marionnaud #8 brush to deposit and blend color on the lower lash line.


Step 07: Then I place a matte black eyeshadow on the other part of the lower lash line to mimic a shadow that coming from the lashes when hit a light source from above. I use the same from from previous step.


Step 08: Place an eyeliner gel on the upper lash line and wing it out on the outer corner eye to create a sexy kitten wing that is famous during the 1950's. I use E.L.F. cream eyeliner in black to create this look. I use Fanny Serrano #14 slant eyebrow/eyeliner brush to get the wing and the line.

That finishes the eye makeup. Easy right? Now you can recreate this eye makeu-up on yourself.


Here's the eye makeup when looking down.


And here's the eye makeup when eyes are open.

For the lips:

I use Etude lip liner to define the shape of the lips then I use Top Tomato by Revlon to get that luscious red color using Artnet lip brush.

For the Face:

I use 2 color of True Match foundation to achieve her skin color. Then I mix nyx, kryolan and covergirl concealer on under eye area, sides of the nose/mount and on spots that need concealing. Then I use kryolan transparent loose powder to set the makeup using E.L.F. powder brush.

For Cheeks:

I use Maybelline blush in peach and cinnamon using Nars Yachiyo brush.

For Eyebrows.

I use wet n' wild eyebrow kit to define her brows using Marionnaud #9 brush.

I hope you like her look and like the tutorial. Let me know if you are able to recreate the look.

See photos below for the ad campaign. Enjoy!


TOTT! Charm PRO Eye Shader Brush #7!


I really like brushes in fact I have more than a hundred already. And when I happen to see one on the mall I just can’t help myself but try it.

One that caught my attention was the Charm PRO Eye Shader Brush #7. Charm PRO Eye Shader Brush #7 reminds me of the MAC 239 brush – the tapered-rounded shape and white colored hair look really similar to each other. So I really got excited and bought 2 instantly.


Here’s what the website tells about Charm PRO Eye Shader Brush #7:

Charm PRO Makeup Brushes are made from the best quality and precise craftsmanship that will ensure you professional results in your makeup application!

The Charm PRO Eye Shader Brush is a very dense brush that picks up substantial amount of eyeshadow and packs on vivid colors on the eyelids.

I have this brush for more than a month already and I already used, cleaned and washed it a couple of times so I think I can do a review of it now.


I really like dense brushes that pickup colors, deposit the colors well and that are soft. Charm PRO Eye Shader Brush #7 picks up color well and deposits it well on the eyelids, however, the brush is so scratchy it hurts the eye area where you put colors specially when you use it for shading to smoke-out the color.


The brush is not soft but not stiff. When you use the top-edge side of the brush to blend the outer v and crease area and deposit color on the lower lash line it scratches and pokes the area.

The one on the left sheds like crazy which does not happen with the one on the right.

I mentioned earlier that I’ve got two and one of the brushes shed like crazy which does not happen with the other brush. And it’s kind of hard to clean it.

The good thing about this brush is that it picks up color, deposit color well and minimize eye shadow fall-out so I'll only use this brush for that purpose only (I don't recommend this brush for blending and shading the lid and crease areas and placing color on the lower lash line). But I was disappointed with it because it hurts the eye unlike Charm PRO Big Blending Brush #11 (that I really like).

This retails for Php 350.00 but I got it with 10% discount at The Ramp Glorietta.

Verdict: Love. Like. Nice. Skip. Drain.

Although it delivers its promise of picking up and packing color (almost like MAC 239 and actually better than other brushes for that purpose) I just can’t stand that it scratches and pokes the area where you use it.

Related Posts Plugin for WordPress, Blogger...