"Beauty will help you get the attention, personality will help you capture the heart, but attitude will help you make everything last."

Splurge!

Legendary Special Effects Make-up Artist Rick Baker colaborates with MAC...

Splurge!

Rihanna Collaborates with MAC Cosmetics for Riri Hearts Fall 2013...

Editorial!

Editorial featuring Sam Ajdani wearing Suits for the modern man...

Tools Of The Trade!

Read my review on ArtNet Professional Brush #153...

Behind The Scenes!

Hair and Make-up for Katrina! Click here...

Beauty Feature!

Eye Makeup with the Colors of Spring 2013!

Showing posts with label tricks. Show all posts

Monday, February 18, 2013

Get The Look! Black And Red Butterfly Eye Makeup!


I was asked to help Yeoh Models for their Spring Summer 2012 Package shoot. The inspiration behind the look for the girls for the shoot is the dark shade surrounding the eyes of a raccoon. During the shooting day, we (the make-up artists) were told to modify the color of the eyeshadows as we like as long as we still include black eyeshadow and retain the shape of the raccoon eyes.

For the model's eyeshadows, I chose the red eyeshadow to mix with black to mimic the color of the wings of a black-and-red butterfly. I really like the outcome and I will be sharing you today how to recreate the look.


Model: Patricia Go of Yeoh Models
Photo & Make-up: Henry G. Anima II
Hair: Mycke Arcano


For this look I use NYX Makeup Make-up Artist kit (photo shown above).


I marked the eyeshadows in the palette for easy eyeshadow reference.

Black and Red Butterfly Inspired Eye Makeup:

Follow the simple steps to below to achieve the look.

Note: Placed the product/s on the space enclosed in white line on the photo above each steps.


Step 01:
Prime and put eye makeup base on the entire eye area starting from upper lash line up to the brow bone. I use NYX Eyeshadow base in skin tone.


Step 02:
Using a blending brush like Mac 224 place black eyeshadow in D3 on the outer eye area and swipe it on the crease towards the inner eye area near the nose. Make sure to use gentle strokes so that the less eyeshadows will be placed on the inner eye area of the crease.


Step 03:
Using a dome eyeshadow brush like Mac 239 place red eyeshadow in F6 on the lid area. Carefully blending it on the edge of the black eyeshadow placed from the previous step. Add more layer of the red eyeshadow depending on the intensity of the color that you want to achieve.


Step 04:
Using a eyeliner brush like Mac 210 place a black gel or cream liner on the upper lash line. Then smudge the gel/cream using Marionnaud No. 8 pencil brush.


Step 05:
Using Marionnaud No. 8 pencil brush place red eyeshadow in F6 on the lower lash line. Starting from the outer eye corner towards the inner eye corner. Make sure that you blend the eye shadow well.


Step 06:
Using a small angle brush like Mac 208 place a black gel eye liner on the lower waterline. Then slightly blend it on the lower lash line.


Step 07:
Using Marionnaud No. 8 pencil brush place black eyeshadow in D3 on the lower lash line to blend the black gel eye liner.


Step 08:
Using a blending brush like Mac 217 combine eye shadows in D1 and D6 the place it on the brow bone towards the inner eye corner in a wild shield wiper motion. Make sure to blend the edges well.

Then Curl your eyelashes with Shu Uemura Eyelash Curler. Apply 2 coats of Maybelline The Magnum Volum' Express Waterproof Mascara (let the mascara dry for 3 to 5 seconds before applying the second coat) from roots to tips. Add false eyelashes to your liking.

Below are the finished look:

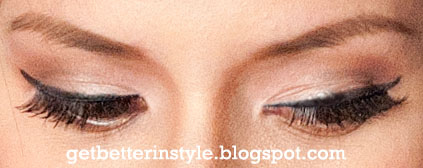
Eye Makeup with eyes close.

Eye Makeup with eyes open.

For Patricia's Brows:

For her eyebrows I use wet n' wild ultimate brow kit powder in Ash Brown. I use the lighter one using MAC 208 brush. I first fill in the highest point of the arch towards the tip of the eyebrow before filling in the part near the nose.

Tip: Try to draw the shape first and check if you like it before putting more eyebrow powder. It's always easier to pack colors than removing the excess. I hope this helps.

For the Face:

I use 2 color of True Match foundation to achieve her skin color. Then I mix nyx, kryolan and covergirl concealer on under eye area, sides of the nose/mount and on spots that need concealing. Then I use kryolan transparent loose powder to set the makeup using E.L.F. powder brush.

For the Cheeks:

I use Maybelline blush in peach and cinnamon using Nars Yachiyo brush. Note: You should put lip balm like Carmex after skin prep.

For the Lips:

Step 01: Line the entire lip area (upper and lower lips) with Etude House Lip Liner in Natural. Purse lips together to distribute lip liner evenly.

Step 02: Apply Kryolan Lipstck in #LF401 (nudel-coral shade). Purse lips together. Repeat this step twice or thrice depending on how long you want your lipstick will stay.

Step 03: Then add a coat of Kryolan Lipstick in #LC132 for that hint of orange. Purse lips together.

Step 04: Set lipstick by pressing tissue in between your upper and lower lips.

Step 05: Apply Etude House clear Lip Gloss in the Middle of your lower lip.

I hope you like her look and like the tutorial too. Let me know if you are able to recreate the look and what you think about it.

Enjoy!

Sunday, February 3, 2013

Get The Look! Pin-up Inspired Makeup for Slimmetry!


I've got the chance to do the makeup and photography for Slimmetry's Ad Campaign. Slimmetry is a clothing brand specializing in Body Forming Corsets and Swimwear. And the makeup for the campaign is inspired by pin-up girls of 1950's. This decade celebrates the voluptuous curves of women and that's what Slimmetry is trying to offer women now - achieving the curves you deserve.


Our model for the campaign is Tanja Winheim - a Spanish/Filipina beauty. The make-up is so sexy and yet so easy to achieve. And it fits for all women. To get the look, just follow the simple steps below:


You may use Dollface 88 Earth Color Palette to create this look.

Tanja's 1950's Eye Make-up:

Note: Placed the product/s on the space enclosed in white line.


Step 01: Prime and put eye makeup base on the entire eye area starting from upper lash line up to the brow bone. I use NYX Eyeshadow base in skin tone.


Step 02: Then using medium shading brown eyeshadow with red undertone, swipe in a windshield wiper motion starting from the outer corner to the inner corner of the eye area to define the crease using a blending brush. I use a Artnet #154 brush to deposit and blend the eyeshadow.


Step 03: Then place a matte skin tone eye shadow on the entire lid and blend it well on the edge of the crease using a dome eye shadow brush. I use Artnet #112 brush to pick-up and deposit color.


Step 04: Then place a matte black eyeshadow on the outer V and outer crease of the eye using a pencil/pointed brush. Make sure to blend the eyeshadow well with the crease color. I use Marionnaud #8 brush to pick-up and define the color.


Step 05: Then place a shimmer vanilla eyeshadow on the inner corner of the eye, center of the lid and the brow bone area to create highlight using a small dome eyeshadow brush. I use the brush that comes with the 10-piece brush set from Suesh.


Step 06: Then place the same eyeshadow color that define the crease on the lower lash line using the a pencil/pointed brush. I use Marionnaud #8 brush to deposit and blend color on the lower lash line.


Step 07: Then I place a matte black eyeshadow on the other part of the lower lash line to mimic a shadow that coming from the lashes when hit a light source from above. I use the same from from previous step.


Step 08: Place an eyeliner gel on the upper lash line and wing it out on the outer corner eye to create a sexy kitten wing that is famous during the 1950's. I use E.L.F. cream eyeliner in black to create this look. I use Fanny Serrano #14 slant eyebrow/eyeliner brush to get the wing and the line.

That finishes the eye makeup. Easy right? Now you can recreate this eye makeu-up on yourself.


Here's the eye makeup when looking down.


And here's the eye makeup when eyes are open.

For the lips:

I use Etude lip liner to define the shape of the lips then I use Top Tomato by Revlon to get that luscious red color using Artnet lip brush.

For the Face:

I use 2 color of True Match foundation to achieve her skin color. Then I mix nyx, kryolan and covergirl concealer on under eye area, sides of the nose/mount and on spots that need concealing. Then I use kryolan transparent loose powder to set the makeup using E.L.F. powder brush.

For Cheeks:

I use Maybelline blush in peach and cinnamon using Nars Yachiyo brush.

For Eyebrows.

I use wet n' wild eyebrow kit to define her brows using Marionnaud #9 brush.

I hope you like her look and like the tutorial. Let me know if you are able to recreate the look.

See photos below for the ad campaign. Enjoy!


Monday, December 10, 2012

Makeover! Rhel Got Better!

Meet Rhel...

Rhel is a natural beauty. She has that girl next door look which makes your head turn towards her whenever she passes by.

For the longest time I wanted to give her a makeover because she's just so beautiful. And I'll surely regret not giving her one.

She just celebrated her 5th year with her current company so I decided to give her a makeover as a reward.

The look that i'll be giving her can easily turn from sweet to sexy by just changing the lip color.

Rhel's makeover are separated in several sections for easy navigation:

Rhel's Eye Make-up
Rhel's Brows
Rhel's Skin
Rhel's Lips
Rhel's Hair
Rhel's Style Guide

Keep on reading to know the step-by-step makeup application I did for her.
For Rhel's look I wanted to bring out her inner sexiness so I use eyeshadows with shimmer on in. I also put emphasis on her crease by darkening the area for that bombshell-like doe eyed look. Then i line her entire eye with black pencil and wing her gel liner out for that sexy cat-eye effect.

Since her eye is already making a bold statement I wanted to diffuse the look a little by putting soft coral color on the lips to maintain her sweetness.
For Rhel's look I mostly used NYX Professional Makeup Make-Up Artist Kit (shown in photo above).
To help you know which eyeshadow I used, I'll mark each one (check above photo) and call each eyeshadow by the mark for easy reference.

Rhel's Eye Make-up: Holiday Sexy Look!

Follow the steps below to achieve her eye make-up.

Step 01:
Prime the entire eye area (enclosed in white dots as shown in the photo above) with NYX Eyeshadow Base in Skin Tone using medium size concealer brush. Then gently pat as you spread the primer to even out the application.
Step 02:
Using synthetic blending brush spread Maybelline Color Studio Eyeshadow in Bad to the Bronze evenly on the entire eyelid (enclosed in white dots as shown in the photo above). Once the cream eyeshadow is dry, pat the lid with NYX Eyeshadow #B5 (choco-bronze shimmer) using Flat Eyeshadow Brush like Artnet 112 or Flat Blending brush like Mac 217.
Step 03:
Then line the upper lash line (enclosed in white dots as shown in the photo above) with Maybelline Expert Eyes Soft Khol Eye Pencil in Black. Smudge Eyeliner using brush like Fanny Serrano brush 14.
Step 04:
Then blend the line softly while adding it with NYX Eyeshadow #D3 (black shimmer) using small brush like MAC 228. Blend it with the eyeshadow on the lid.
Step 05:
Using MAC 219 pencil brush color the crease with NYX Eyeshadow #C5 starting from the outer eye area going to the inner eye area. Blend it out from the outer eye area towards the inner eye area.
Step 06:
Apply Fanny Serrano Honey Glitter individual eyeshadow (enclosed in white dots as shown in the photo above) starting from the brow bone and blend the eyeshadow (shimmer) towards the crease using blending brush like Artnet 154 or MAC 224.
Step 07:
Then line the lower waterline (enclosed in white dots as shown in the photo above) with Maybelline Expert Eyes Soft Khol Eye Pencil in Black.
Step 08:
Smudge the pencil that goes beyond the  waterline and add NYX Eyeshadow #B5 on the lower lash line (enclosed in white dots as shown in the photo above) using MAC 224 brush.
Step 09:
Then add NYX Eyeshadow #D3 on the outer lower lash line (enclosed in white dots as shown in the photo above) using small MAC 228 brush. Blend it gently with the eyeshadow applied on the lower lash line but stop before it reached the middle area.
Step 10:
Using MAC 201 eyeliner brush, apply Maybelline Eye Studio Gel Eyeliner in Black on the upper lash line (enclosed in white dots as shown in the photo above). Wing-out the gel eyeliner for that cat-eye effect.

Then Curl your eyelashes with Shu Uemura Eyelash Curler. Apply 2 coats of Maybelline The Magnum Volum' Express Waterproof Mascara (let the mascara dry for 3 to 5 seconds before applying the second coat) from roots to tips (do not wiggle when applying when you want a more natural finish). Add false eyelashes to your liking.

Below is the finish look:

Finished Eye Make-up with Eyes Close.
Finished Eye Make-up with Eyes Open.

go back to top

For Rhel's Brows:

For her eyebrows I use wet n' wild ultimate brow kit powder in Ash Brown. I use the lighter one using MAC 208 brush. I first fill in the highest point of the arch towards the tip of the eyebrow before filling in the part near the nose.

Tip: Try to draw the shape first and check if you like it before putting more eyebrow powder. It's always easier to pack colors than removing the excess. I hope this helps.


go back to top

For Rhel's Skin: Fresh Flawless Skin!

Note: Step 01 should be skin prep and I will write about this on separate blog entry.

Below are the steps to achieve "Fresh Flawless Skin":

Step 01: I prime the entire face using Revlon Photoready Perfecting Primer in 001.
Step 02: I use Dermacolor corrector/concealer on the under eye area to reduce the dark circles.
Step 03: I use L'oreal True Match Foundation in N7 on her skin. Slowly building the foundation up as needed using MAC 189 foundation brush.
Step 04: I put on concealer on under-eye area, corners of the nose, corner of the mouth and spot correcting on areas that need concealing using MAC Pro Longwear Concealer in NC35. Make sure to blend it well with the rest of the skin.
Step 05: Then set the foundation and concealer with Ben-Nye Banana Powder.
Step 06: Then I put bronzer under her cheeks to bring out her cheek bones. Then I blend the upper edge where the bonzer ends with Maybelline Peachy Sweetie blush (peach colored blush) and added more blush from the apple of her cheeks towards the temples using Nars Yachio brush.

go back to top

For Rhel's Lips: Sweet Pout!

Note: You should put lip balm like Carmex after skin prep.
 
Below are the steps to achieve "Sweet Pout" lips:
Step 01: Line the entire lip area (upper and lower lips) with Etude House Lip Liner in Natural. Purse lips together to distribute lip liner evenly.
Step 02: Apply Kryolan Lipstck in #LF401 (nudel-coral shade). Purse lips together. Repeat this step twice or thrice depending on how long you want your lipstick will stay.
Step 03: Then add a coat of Kryolan Lipstick in #LC132 for that hint of orange. Purse lips together.
Step 04: Set lipstick by pressing tissue in between your upper and lower lips.
Step 05: Apply Etude House clear Lip Gloss in the Middle of your lower lip.

go back to top

For Rhel's Hair: "Upper East-side" Volumes!

Tip: Start with Hairstyling so that you will have enough time to set your hair rollers. Then finish hair after you finish applying your makeup.

This is similar to Michelle's hairstyle from previous makeover entry (click here). The hairstyle is versatile enough that can be worn whether you have long or shoulder length hair.

Below are the steps to achieve "Upper East-side Volumes" Hair Style:
Step 01: Spray hair with water to make it damp.
Step 02: Apply hair mousse.
Step 03: Blow dry hair using Babyliss hair blow drier and round large pig hair comb.
Step 04: Then separate hair into different groups. Then curl each group of hairs using Babyliss hair curler or Babyliss flat iron. After curling or ironing each group of hairs use rollers and roll each group and set it for few hours. Use large size rollers on hairs near the face and medium size rollers on the back.
Step 05: After you finished curling and putting hair rollers, spray it with Hair Spray to help the hair hold the curls.
Step 06: If the hair is all set, remove the hair rollers. Then slightly brush the hair with large paddle brush.

go back to top

Style Guide: Rhel's Looks!

I once again collaborated with fellow stylist James Reido to mix and match Rhel's wardrobe. We also asked Rhel to bring her favorite clothes, shoes and accessories so we could help her mix and match her wardrobe.

Below are the looks that we created for Rhel:

Look 01:
Party Dress from Greenhills - Php 350.00
Necklace from Divi - Php 200.00
Bangles from Landmark - Php 150.00
Look 02:
From Look 01 just add Black Jacket from Solo (Glorietta) - Php 1,500.00
Look 03:
Casual Dress from Landmark - Php 400.00
Gray Blazer from Maldita (Glorietta) - Php 1,500.00 to Php 2,000.00 price range
Necklace from Divi - Php 200.00
Bracelet from Online Store - Php 100.00
Look 04:
Casual Dress from Landmark - Php 350.00
Bangles from Market Market - Php 150.00
Beaded bracelet from Market Market - Php 100.00
Necktie worn as headband from Armando Caruso
Look 5:
From Look 04 just add Black Blazer from Express - Php 1,000.00

Credits:
Images: Henry Anima II
Hair & Make-up: Henry Anima II
Styling: James Reido

What do you think of Michelle's look? Please leave a comment.Also for alternative products to get this look just leave a comment and I'll give get back to you.

I hope you like Rhel's makeover and I'm sure you'll love recreating her look on yourself. I am looking forward for your comments.

Related Posts Plugin for WordPress, Blogger...