"Beauty will help you get the attention, personality will help you capture the heart, but attitude will help you make everything last."

Splurge!

Legendary Special Effects Make-up Artist Rick Baker colaborates with MAC...

Splurge!

Rihanna Collaborates with MAC Cosmetics for Riri Hearts Fall 2013...

Editorial!

Editorial featuring Sam Ajdani wearing Suits for the modern man...

Tools Of The Trade!

Read my review on ArtNet Professional Brush #153...

Behind The Scenes!

Hair and Make-up for Katrina! Click here...

Beauty Feature!

Eye Makeup with the Colors of Spring 2013!

Showing posts with label DIY. Show all posts

Friday, May 24, 2013

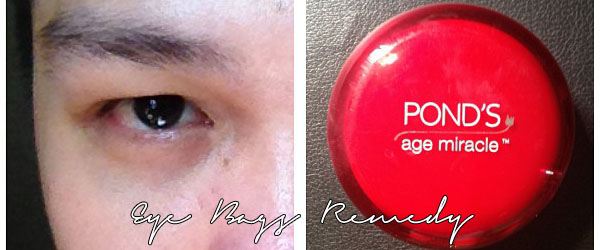
Quick Tip! Eye Bags Remedy And More!


Having problems with eye bags? Fine line and crows feet?

I had the same problem since I have eye bags too. I have fine lines and crows feet as well.

What I do to keep them at bay and prevent from having them again is I use Pond's age miracle Dual Action Eye Cream. I only use this before going to sleep (I use different product during day time).


Pond's age miracle Dual Action Eye Cream has two different cream in two different formula inside. 1st cream (with pink color) I put on lid and 2nd cream (which is white) I put on under eye area.

I've been using this since 2011 and it helps reduce eye bags discoloration, reduce puffiness, and reduce/prevent fine lines and crows feet.

I am hesitant to use it at first because the more popular product didn't help me at all, but my make-up instructor and friend told me to try it since it works really well on her. And I'm glad she was able to convince me because it works well on me too.

Having the same problem? Try using Pond's age miracle Dual Action Eye Cream too, this might be the one solution you've been looking for.

Thursday, May 23, 2013

Quick Tip! Get That Smooth and Kissable Lips!


Want that smooth and kissable lips?
Here's how:

1. Exfoliate your lips by brushing it gently before you sleep at night.
2. Then using cotton bud get half a pea size amount of Carmex and roll the cotton bud onto the lips until dry skin is removed and lips are smooth.
3. Use carmex the next day and make sure to purse lips together.

Carmex is effective yet affordable. Available in pots and in tubes. I use this on both male and female clients.

Saturday, January 12, 2013

Quick Tip! Save Your Favorite Mascara Wands!


Do you hate it when you have to throw away your empty mascara tube along with it your favorite mascara wand? Or having your favorite mascara but you doesn’t really like the wand that comes with it? I certainly do.

Now, I got a little quick suggestion for you. Throw your empty mascara tube but save the mascara wand. Just clean your wand and reuse it! Here’s how I do it:

First, gather all the things you need:


Your empty mascara tube with your favorite wand with it.


Dishwashing soap (preferably with antibacterial formulation) and bowl or container (big enough to soak the wand).


Brush cleaner.

Tissue or towel, old toothbrush and zip locks.

Here’s how I clean my favorite mascara wands:
  1. Put dishwashing soap in an empty container.
  2. Soak your favorite mascara wand overnight. This will remove the mascara from the wand when mixed with dishwashing soap.
  3. Brush gently your mascara wand with old toothbrush to remove mascara off the wand.
  4. Put your wand under running water until all mascara is gone.
  5. Then roll your wand on a towel to dry it.
  6. Then place your wand on top of a tissue and spray it with a brush cleaner.
  7. Then roll it on the tissue and place it on top of another tissue to dry.
  8. Now your favorite mascara is clean and is now ready to use. Just put it on a zip lock for storage and to prevent it from getting dirty.

How to use your favorite mascara wand:
  1. Choose your favorite mascara then take ample amount off the mascara (from the wand that comes with it) and place it on a mixing palette or at the back of your hand.
  2. Get your favorite (clean) mascara wand and swipe it gently on the mascara you placed on the mixing palette or at the back of your hand.
  3. Swipe the mascara onto your lashes.
  4. Now you have a great looking lashes using your favorite mascara and your favorite mascara wand.
Easy, right?

Let me know what you think about it.

Friday, January 11, 2013

DIY! Mix Your Own Lip Color in 4 Easy Steps!


Sometimes when you are mixing and painting two different colors of lipstick on a client (or yourself) the process can be messy and can be time consuming. Sometimes you end up putting color on other tube then staining and ruining the original color. To save time and prevent you from getting messy during mixing two different colors of lipstick (on actual makeup application) follow the simple steps to create your own mix of lip color below.

Note: If you are a kid make sure you ask your parent (or an adult) to assist you.

Click here to go directly to the 4 easy steps.

Things you need:


1. Your favorite lipsticks in different colors.


2. Spatula for taking small part of lipstick from a tube and mixing lipsticks together.


3. Teaspoon or


Tablespoon (for larger container).


4. Empty lipstick palette or


Empty tiny jars (you can buy from Landmark, Beabi or Muji) to put your lip mix.

5. Flame (from a stove or from a candle).

Here are the 4 easy steps:


  • Using the spatula, slice a portion of your favorite lipstick and place it on the spoon. Clean your spatula then slice another portion of lipstick with different color and add it to the first lip color. It is up to you to place the ratio of two different colors. Just add some more to achieve the color you want.
  • Then place it above a flame with medium heat (I place mine over a stove but you may use a candle and it will do the trick) to melt.
  • Mix the lipstick by stirring then well with spatula when melted to get an even mixture.
  • Place the mixture on an empty palette or jar and allow the mixture to harden.

Congrats! You got yourself a new shade of lip color! Just use your lip brush to get color from the pan and apply it to yourself. Easy, right?

Enjoy creating your lip color too and let me know what you think about it.

That's it but you may check more photos below for more color mixtures I created.


Here's another mixture. Lovely color, right?


You may also mix the two lip colors together before melting to create your new lip color a bit faster.

I created a total of 11 lip colors by mixing different lip colors and different rations. Check all the colors and ratios below:

Mix 1, 2 and 3.

Mix 4, 5 and 6.

Mix 7, 8 and 9.

Mix 10 and 11.

And here are the new shades of lip colors I created on a palette. I numbered the colors based on the mixtures above. The ones with no numbers are the original shades I used to create the new lip colors.

Palette 1.

Palette 2.


QUICK TIP: If you are a bit OC you may use hair blow drier to make your lip color look even and a lot better in your palette. Just let the heat from the blower melt the top part slowly to even it out in the palette (see photo below).


Happy mixing!!!

Related Posts Plugin for WordPress, Blogger...